
Einleitung
Mit dem Update auf Version 2.57 Silent Brick steht eine optimierte S3-Implementierung für S3-Freigaben mit Objektsperrung zur Verfügung.
Die Verwendung der neuen S3-Implementierung ist optional, wird jedoch aufgrund der Optimierung der Leistung und des Speicherplatzbedarfs dringend empfohlen. Um die neue Implementierung verwenden zu können, muss eine neue Freigabe eingerichtet werden.
In diesem Handbuch werden die Schritte zum Migrieren vorhandener S3-Daten auf eine neue S3-Freigabe beschrieben, falls erforderlich.
-
-
In Version 2.57 Silent Brick wurde der S3-Server auf eine neue Version aktualisiert. Diese Version bietet eine höhere Leistung und einen deutlich reduzierten Overhead für S3-Freigaben mit Objektsperrung.
-
Auf vorhandene S3-Freigaben mit Objektsperre kann weiterhin zugegriffen und sie können weiterhin verwendet werden. Um die Leistungs- und Overhead-Vorteile nutzen zu können, muss eine neue Freigabe erstellt werden. In dieser Anleitung wird beschrieben, wie vorhandene S3-Daten in eine solche neue Freigabe migriert werden.
-
Achten Sie auf Ihre Objektsperren. Wenn Sie Daten auf eine neue Freigabe auf derselben Volume migrieren, können Sie am Ende doppelte Daten haben, da die Originaldaten aufgrund von Objektsperren nicht gelöscht werden können!
-
Mit dieser Anleitung werden auch gelöschte und zur Löschung vorgesehene Daten kopiert.
-
-
-
Überprüfen Sie zunächst den verfügbaren Speicherplatz auf der Volume
-
Wenn keine 60 % mehr frei sind, wenden Sie sich bitte an den FAST-Support, da die Daten nicht dupliziert werden können.
-
Wenn 60 % oder mehr Platz verfügbar sind, fahren Sie mit dem nächsten Schritt in diesem Handbuch fort
-
Bedenken Sie, dass vorhandene Daten möglicherweise einer Objektsperre unterliegen und nicht innerhalb einer bestimmten Zeit gelöscht werden können.
-
Alternativ können Sie ein neues Volume auf einem leeren Silent Brick als Kopierziel erstellen.
-
-
-
Beispiele sind immer bei den einzelnen Befehlen aufgeführt. Dabei werden zwei Shares verwendet
-
Die beiden Shares im Beispiel liegen auf dem Controller mit der IP-Adresse 172.20.44.167 und heißen
-
old_data_object_lock – für die vorhandene S3-Freigabe mit Objektsperre. Port 9000
-
new_data_object lock - für die neue Freigabe, auf die die Daten übertragen werden sollen. Port 9001
-
Zugangsdaten für beide Freigaben:
-
Zugriffsschlüssel: abcd1234
-
Geheimer Schlüssel: secretkey
-
-
-
MinIO stellt einen Client zur Verfügung, der in diesem Handbuch zum Kopieren der Daten verwendet wird
-
Wenn Sie im Windows Explorer bereits ein Add-On für S3 verwenden, können die Daten mit diesem Tool kopiert werden.
-
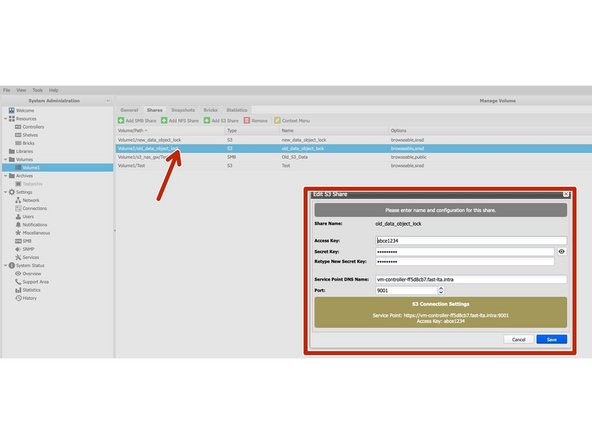
Wir empfehlen, die Freigabeeinstellungen zu notieren und die Freigabe umzubenennen und den Port zu ändern. So kann eine neue Freigabe mit den ursprünglichen Einstellungen eingerichtet werden.
-
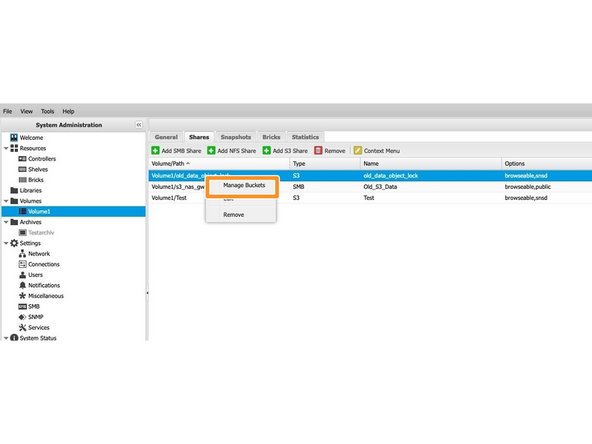
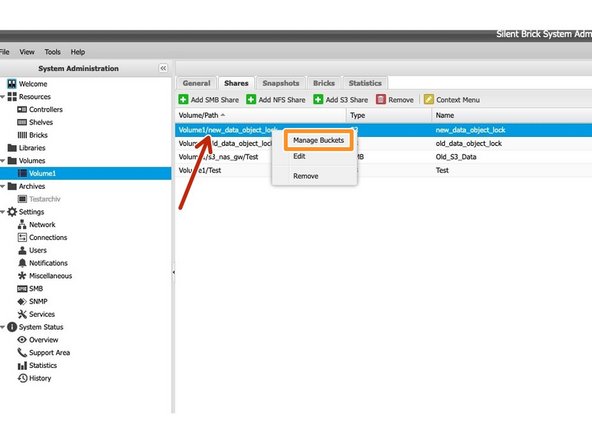
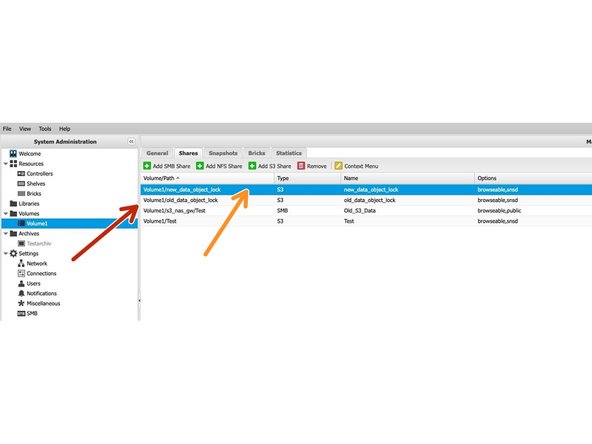
In diesem Beispiel soll der bestehende S3 Share old_data_object_lock kopiert werden
-
Klicken Sie mit der rechten Maustaste auf die alte Freigabe, um die vorhandenen Buckets über Buckets verwalten anzuzeigen.
-
Notieren Sie sich die Bucket-Namen der vorhandenen Freigaben
-
-
-
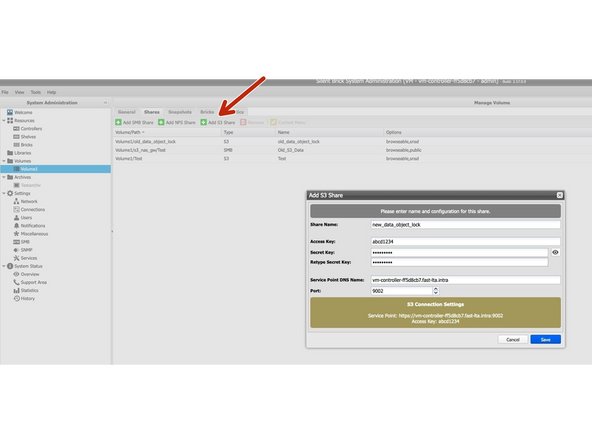
Erstellen Sie nun eine neue Freigabe auf dem Ziel Volume.
-
Der Freigabename kann später nicht mehr geändert werden. Verwenden Sie daher einen Freigabenamen, der an der Quelle leicht angepasst werden kann.
-
Übernehmen Sie die Einstellungen der alten Freigabe, um eine spätere Verbindung so einfach wie möglich zu gestalten
-
-
-
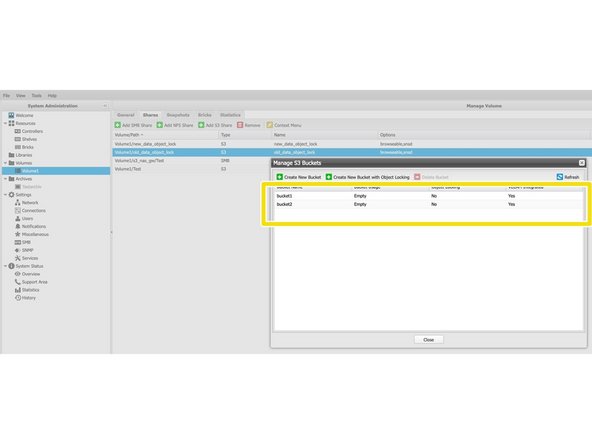
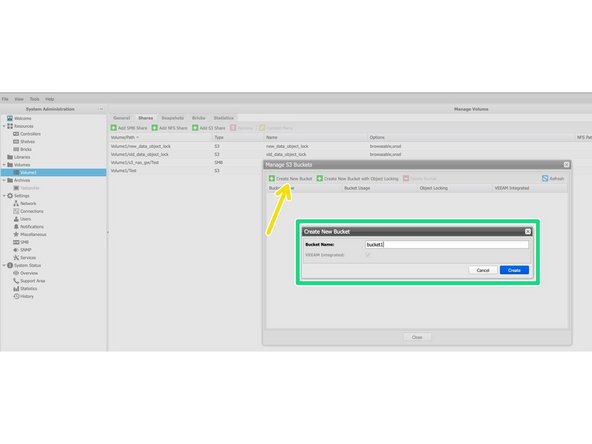
Erzeugen Sie nun auf dem neuen Share die gleichen Buckets wie auf dem alten Share.
-
Klicken Sie mit der rechten Maustaste auf die neue Freigabe.
-
Klicken Sie auf Buckets verwalten
-
Verwenden Sie „Neuen Bucket erstellen“
-
Geben Sie nun den Bucket-Namen ein und speichern Sie die Änderungen.
-
Tun Sie dies für jeden Bucket der alten Freigabe
-
-
-
Laden Sie den MinIO-Client für Ihr Betriebssystem herunter von der Minio Download Page
-
Installieren Sie den Client und führen Sie die folgenden Schritte aus (hier für Windows beschrieben):
-
Kopieren Sie nun die Datei mc.exe in den Pfad
-
C:\Benutzer\<my_user> \mc\ -
Dies ist erforderlich, damit auf die in diesem Ordner liegende MC-Konfigurationsdatei zugegriffen werden kann.
-
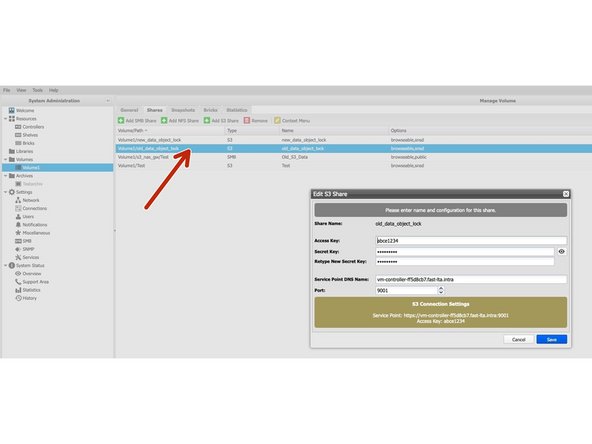
Um den Client zu konfigurieren, benötigen wir nun noch einige Daten aus dem alten S3 Share. Klicke auf den S3 Share um die Shareinfo zu öffnen
-
Wir benötigen hier nun den Sharenamen (old_data_object_lock), die IP-Adresse bzw. den Rechnernamen und den S3-Port
-
Dann brauchen wir den Zugangsschlüssel und den geheimen Schlüssel
-
-
-
Diese Daten müssen nun in die mc Config Datei eingetragen werden. Diese Datei befindet sich in Windows unter
-
C:\Benutzer\<my_user> \mc\config.json -
Wechseln zu C:\Benutzer\<my_user> \mc\
-
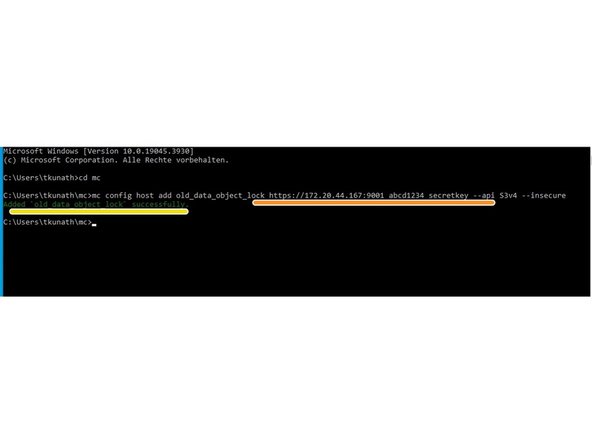
Führen Sie den folgenden Befehl aus, um die MC-Konfigurations-JSON mit den benötigten Daten zu füllen
-
MC-Konfigurationshost hinzufügen <S3 share name> https://<IP_address:port> <access_key> <secret_key> --api S3v4 --unsicher -
Der Parameter `--insecure` muss verwendet werden, da die Systeme Silent Brick standardmäßig ein selbstsigniertes SSL-Zertifikat verwenden. Wenn Sie ein proprietäres SSL-Zertifikat auf dem System installiert haben, muss `--insecure` Erweiterung nicht an den Befehl angehängt werden.
-
In diesem Beispiel: MC-Konfigurationshost hinzufügen alte_Datenobjektsperre https://172.20.44.167:9001 abcd1234 geheimer Schlüssel --api S3v4 --unsicher
-
Wenn der Befehl sauber durchläuft, erscheint eine Bestätigung
-
-
-
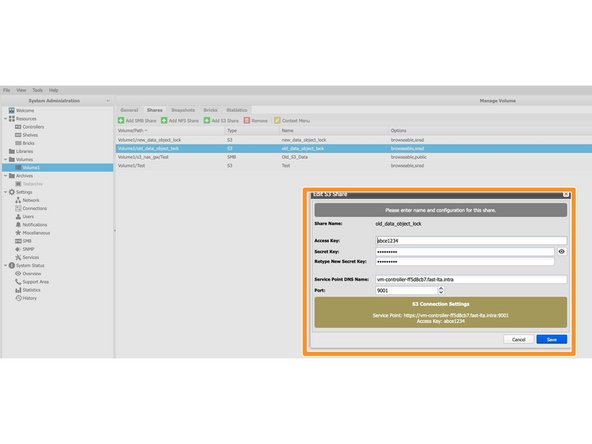
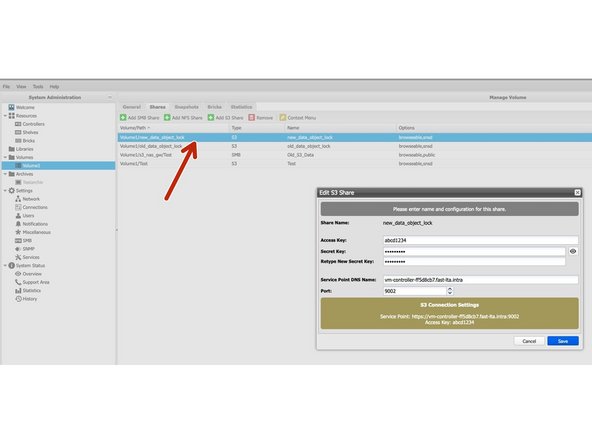
Wir müssen nun die gleichen Schritte für die neue Freigabe durchführen
-
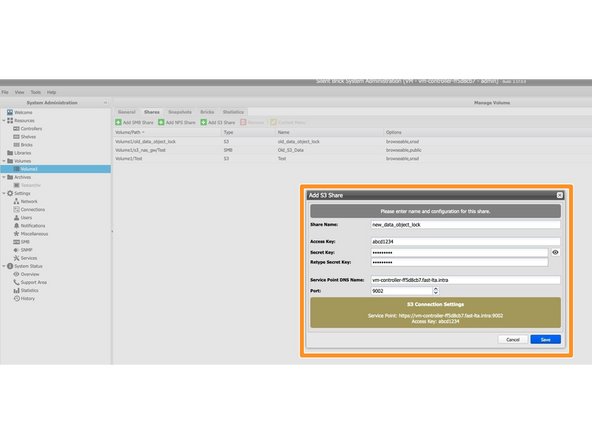
Klicken Sie auf die S3-Freigabe, um die Freigabeinformationen zu öffnen
-
Wir benötigen hier nun den Sharenamen (new_data_object_lock), die IP-Adresse bzw. den Rechnernamen und den S3-Port
-
Dann brauchen wir den Zugangsschlüssel und den geheimen Schlüssel
-
-
-
Die Informationen zum neuen S3-Share müssen nun auch in die mc Config Datei eingetragen werden.
-
Wechseln zu C:\Benutzer\<my_user> \mc\
-
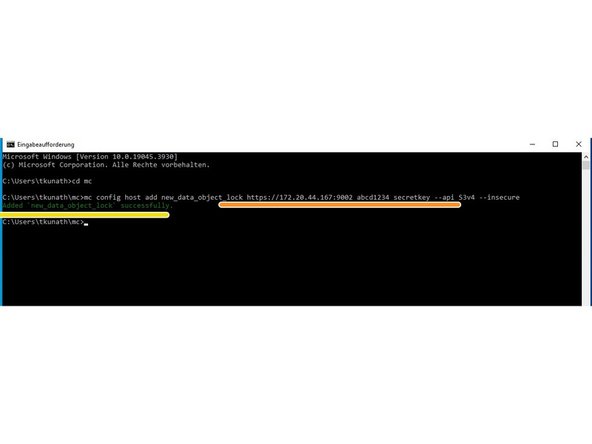
Führen Sie den folgenden Befehl aus, um die MC-Konfigurations-JSON mit den benötigten Daten zu füllen
-
MC-Konfigurationshost hinzufügen <S3 share name> https://<IP_address:port> <access_key> <secret_key> --api S3v4 --unsicher -
In diesem Beispiel: MC-Konfigurationshost hinzufügen neue_Datenobjektsperre https://172.20.44.167:9002 abcd1234 geheimer Schlüssel --api S3v4 --unsicher
-
Wenn der Befehl sauber durchläuft, erscheint eine Bestätigung
-
-
-
Da es sich bei dem S3 Share mit Object Lock grundsätzlich um ein Wurmmedium handelt, sollten hier auch die gelöschten Daten und Aufbewahrungszeiten übertragen werden. Dies kann durch eine Angabe im Kommando sichergestellt werden.
-
'‚--replicate „löschen, Löschmarkierung, vorhandene Objekte“ ‚‘übernimmt alle gelöschten Elemente, die zum Löschen vorgesehen sind und alle aktiven Elemente. Wenn die gelöschten Elemente nicht benötigt werden, genügt es, nur --replicate "existing-objects" zu verwenden
-
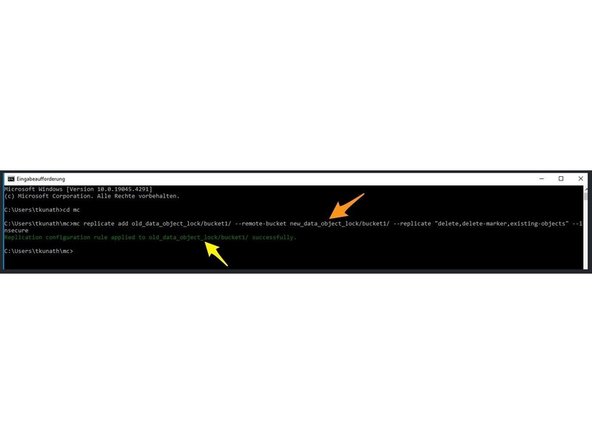
Der Kopierbefehl für einen Bucket lautet:
-
mc replizieren hinzufügen<source S3 share/Bucket/> --remote-bucket<target S3 share/bucket/> --replicate "löschen, Löschmarkierung, vorhandene Objekte" --insecure -
Hier im Beispiel:
-
mc replicate add alte_Datenobjektsperre/Bucket1/ --remote-bucket neue_Datenobjektsperre/Bucket1/ --replicate "löschen, Löschmarkierung, vorhandene Objekte" --insecure -
Wenn der Befehl fehlerfrei ausgeführt werden kann, erhalten Sie eine Bestätigung.
-
Zwischen dem alten und dem neuen S3 Share ist nun eine Replikation eingerichtet. Diese ist solange aktiv, bis sie wieder ausgeschaltet wird. Damit werden auch neu eingehende Daten vom alten in den neuen Share übertragen.
-
-
-
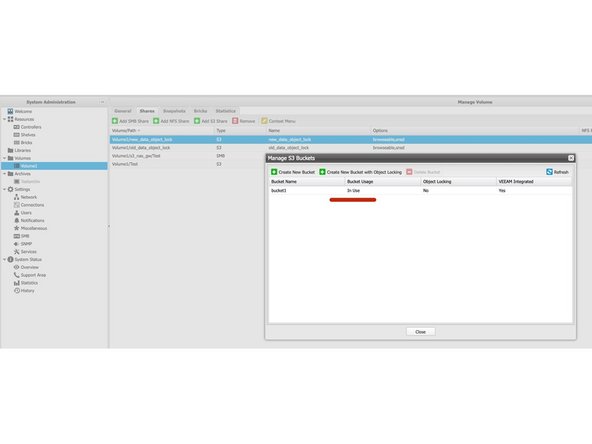
Im neuen S3-Share sieht man nun, dass dieser nicht mehr leer ist, da Daten übertragen wurden.
-
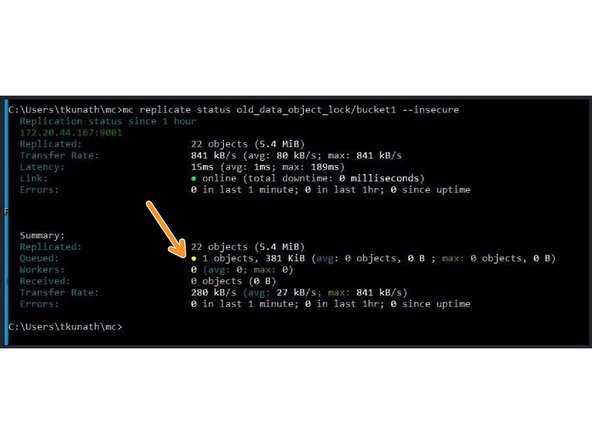
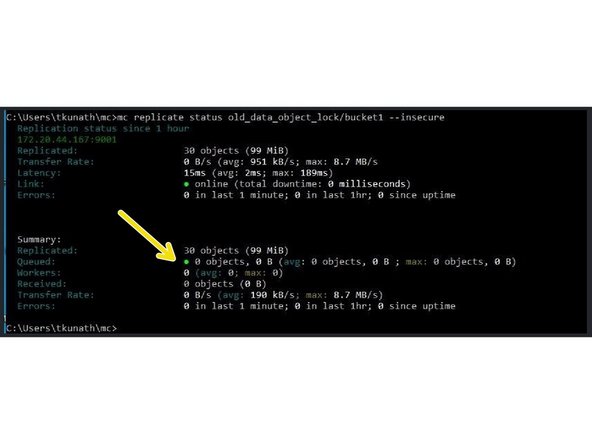
Sie können jetzt MC-Replikationsstatus um zu prüfen, ob die Replikation zwischen den beiden Knoten ausgeführt wird. Während der Datenübertragung können Sie sehen, wie viele Daten derzeit zwischengespeichert sind und wie schnell die Daten übertragen werden.
-
Der Befehl hierfür lautet: MC-Replikationsstatus<source S3 share/bucket> -- unsicher
-
Hier noch einmal im Beispiel: mc Replikationstatus old_data_object_lock/bucket1 --unsicher
-
Nachdem die Daten übertragen wurden, ist der Warteschlangenstatus wieder grün.
-
Da es sich um eine fortlaufende Replikation handelt, kann sich der Status mehrmals ändern, da eine Warteschlange aufgebaut und immer wieder abgearbeitet wird, solange Daten vorhanden sind. Der Vorgang ist abgeschlossen, wenn sich die Anzahl der replizierten Daten über einen längeren Zeitraum nicht mehr ändert.
-
-
-
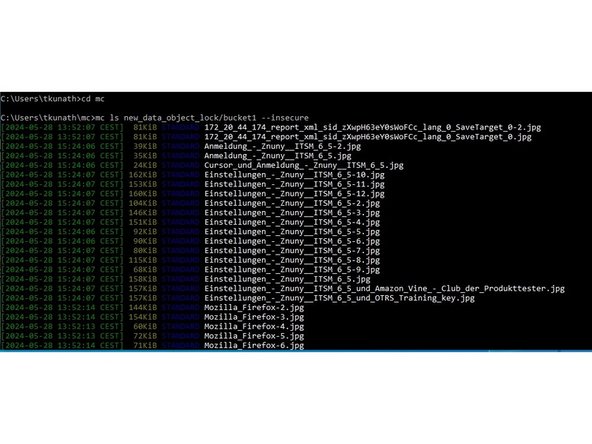
Sie können die Daten zu den Aktien auch abfragen mit mc-ls
-
mc-ls<S3 Share/Bucket> -- unsicher -
Hier beispielsweise eine Abfrage des neuen S3-Shares
-
mc ls new_data_object_lock/bucket1 --unsicher
-
-
-
Wenn Sie sicher sind, dass alle Dateien übertragen wurden, können Sie Ihre Datenquelle, z.B. Veeam, auf den neuen Share verschieben. Wenn Sie die gleichen Zugangsdaten wie beim alten Share gewählt haben, müssen lediglich der Sharename und der Port angepasst werden.
-
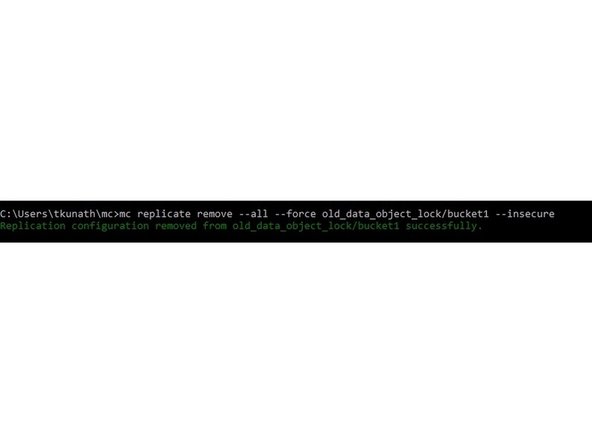
Anschließend kann die Replikation zwischen den beiden Shares wieder aufgehoben werden.
-
Dies geschieht mit folgendem Befehl:
-
mc replizieren entfernen --all --force<source S3 share/bucket> -- unsicher -
Hier im Beispiel:
-
mc replicate entfernen --all --force old_data_object_lock/bucket1 --insecure -
Führe nun die oben genannten Schritte für alle deine Eimer durch. Achte dabei auf die Füllmenge deines Volume!
-


Team
